


This builds on the documentation by Roman Dial (blog, video) and Timmy Johnson.
Safely Rigging Your Packraft
A few considerations
Justification
Even if you have no interest in white water, thigh straps are the single most important modification you can make to your packraft. Think of it as the difference between clipless pedals and cages on your bike… or tying shoes tight before a run. The boat will be more responsive, handle better, track better, etc. Eddy lines don’t grab as strongly. My legs used to always fall asleep, but with thigh straps and the seat moved forward my circulation is somehow improved.
Selecting tie-downs
I prefer the tie-downs made by Alpacka for their 5$ cost and weight. However, I’ve ripped through four of them. If you plan on using thigh straps for aggressive rolling, consider using larger D-ring patches, PVC or urethane-coated, like the Aire 1″ D-Ring or the NRS packraft patch (update: the NRS packraft patches have a poor reputation), at least at the hip positions. I have NRS D-Rings attached at the hips, where the force is the greatest, and Alpacka tie-downs at the feet. If you plan on using thigh straps more for control (class III and below), go with all four Alpacka tie-downs.
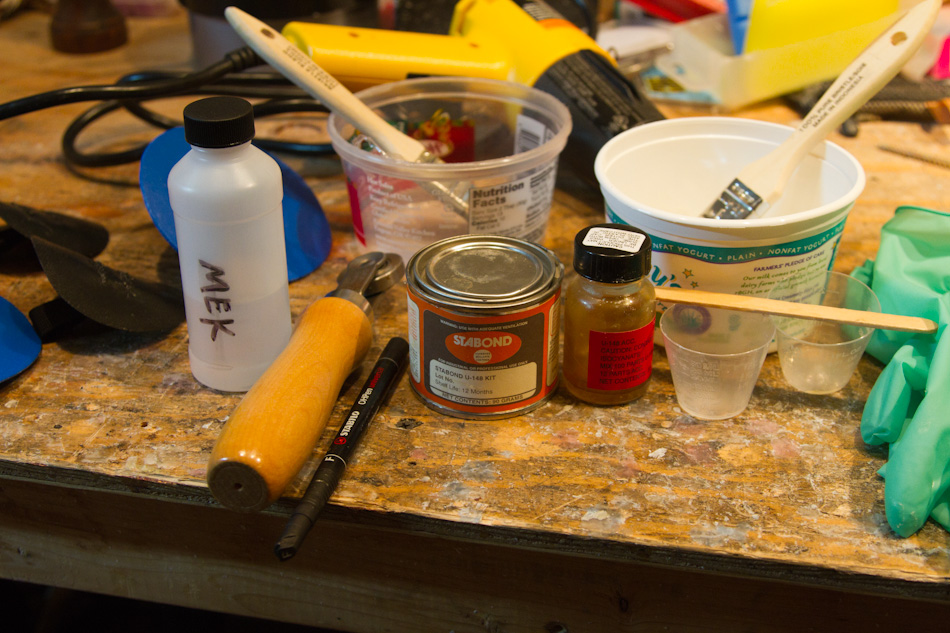
Glue
I’ve used Stabond U-148 two-part glue (expensive) and Alpacka-recommended Locktite Vinyl, Fabric & Plastic Flexible Adhesive one-part glue (cheap, easy to find and use). I have complete faith in the Stabond, but have seen the vinyl adhesive fail. These guidelines assume you are using the Stabond glue. With Locktite Vinyl Adhesive, simply use one coat of glue on the surfaces and skip steps 3 and 4. Apparently Stabond is not available in Europe; here are directions (in German) for the glue recommended there.
Straps
If you are going to be doing any rolling, get the AIRE thigh straps. They have recently replaced the plastic buckles with metal cams, which is a bummer for us. If I had the new straps I’d find a way to replace the metal cams with something lighter. For backcountry or more casual trips, a 1-inch webbing strap works well (see photo at bottom of page).
Additional tie-downs
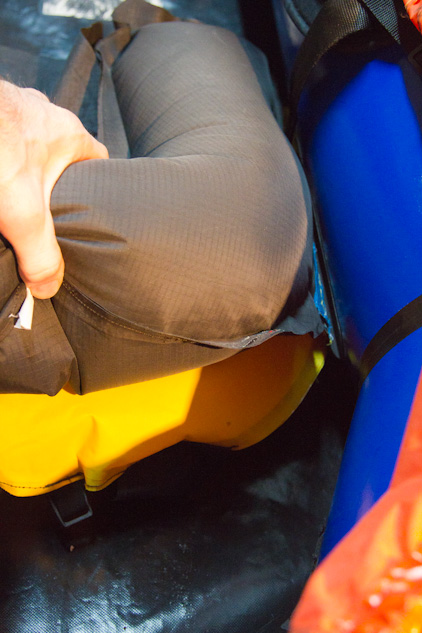
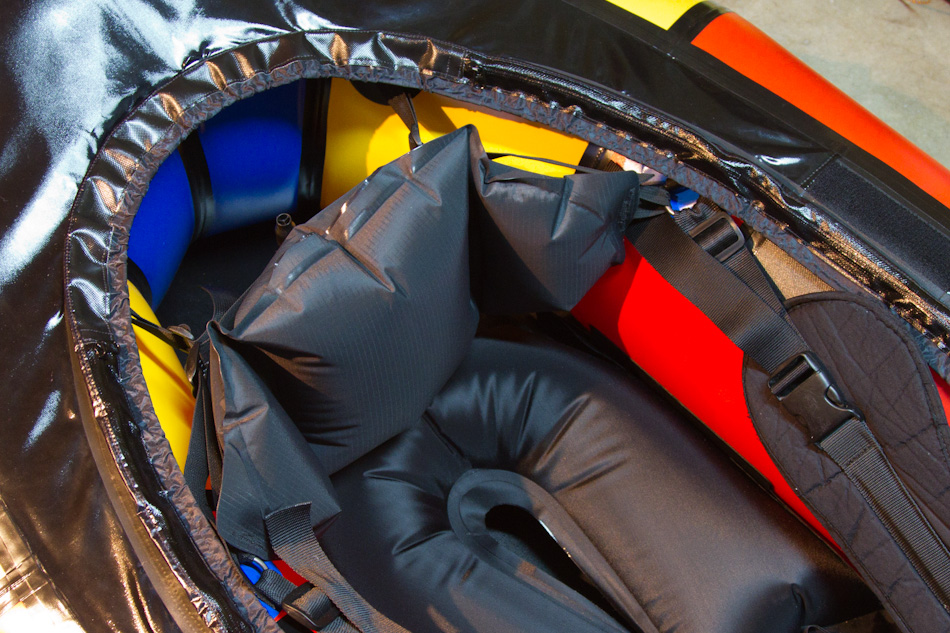
If you are mixing glue anyway, consider adding tie-down loops to the stern. The two loops shown in the cockpit photo (top of page, left) are useful for attaching skis.
Installing Thighstraps
1) Mark the tie-down position
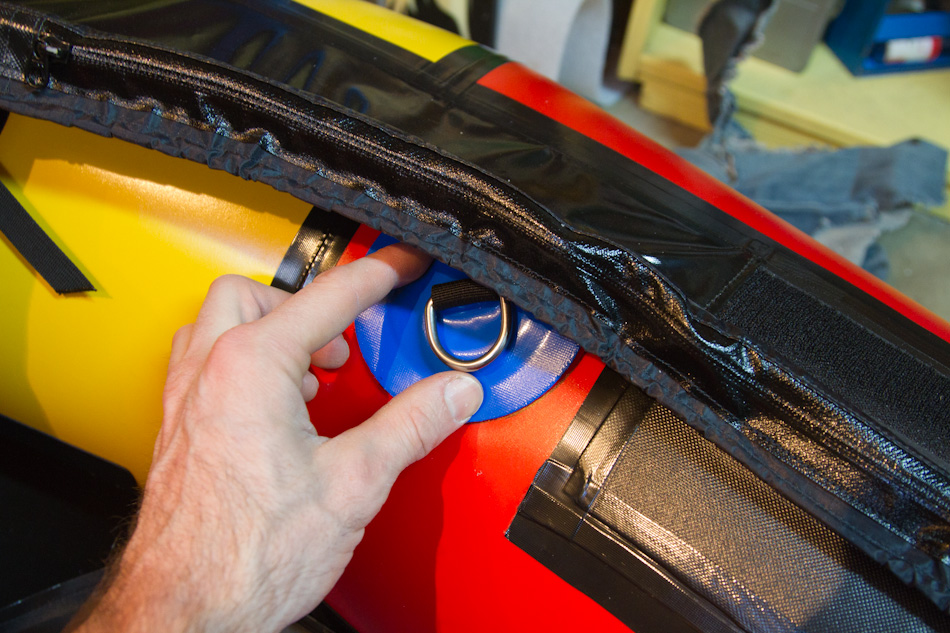
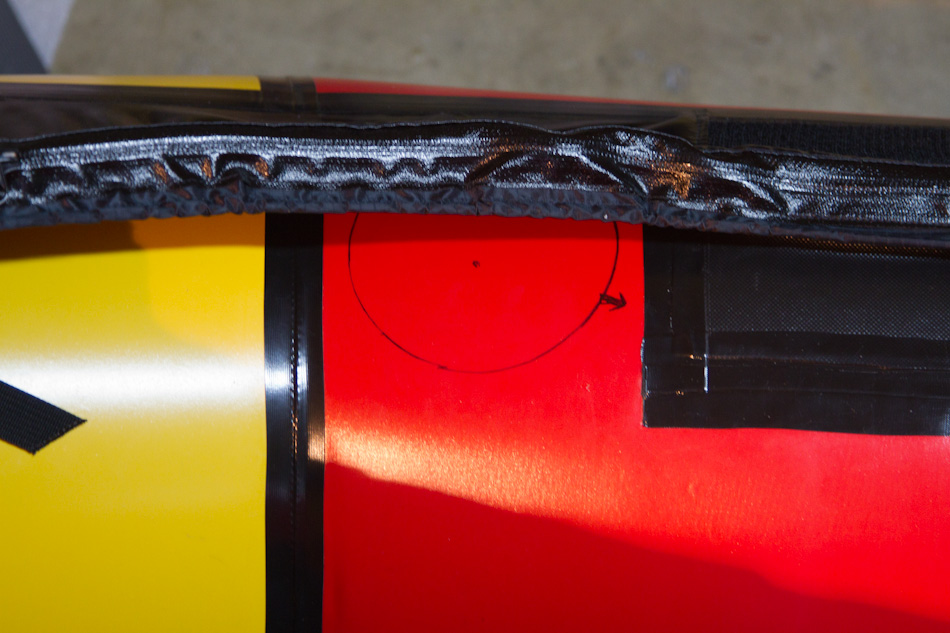
Outline tie-down loop placements with a pen or permanent marker (Figs. 1 and 2). The thigh attachment points should be slightly in front of the rear-to-center tube join and 2-3 inches (~6 cm) down from the top surface of the tube. The foot attachment points should be ~6 inches (~15 cm) in front of the center-to-front tube join, and a few inches up from the floor. The distance between each pair should be ~30 inches (~74 cm). I like to leave at least an inch between all joins and the floor or skirt so that the heat gun doesn’t weaken any existing glue. Make a mark to indicate the direction the tie-down loop will be oriented (toward the other end of the thigh strap, see Fig. 2).


2) Etch the tie-down positions.
Use a 1-inch paint brush to etch the surface of the boat where the tie-down loops will be attached. I’ve only used MEK to etch. Coat each location ~5 times. The surface should be slightly tacky to the touch when sufficiently etched.
3) Coat both surfaces to be bonded.
Mix the 10:1 Stabond U-148 glue. The fumes are nasty- make sure to open windows. Coat the surface of each attachment position and the tie-downs three times using a disposable 1-inch brush (not foam). Use enough glue to quickly cover the surface, but not so much glue that you have beads on the surfaces. I rotate through each position/tie-down so that by the time I’ve finished the first coat, the surfaces are dry and ready for the next coat.
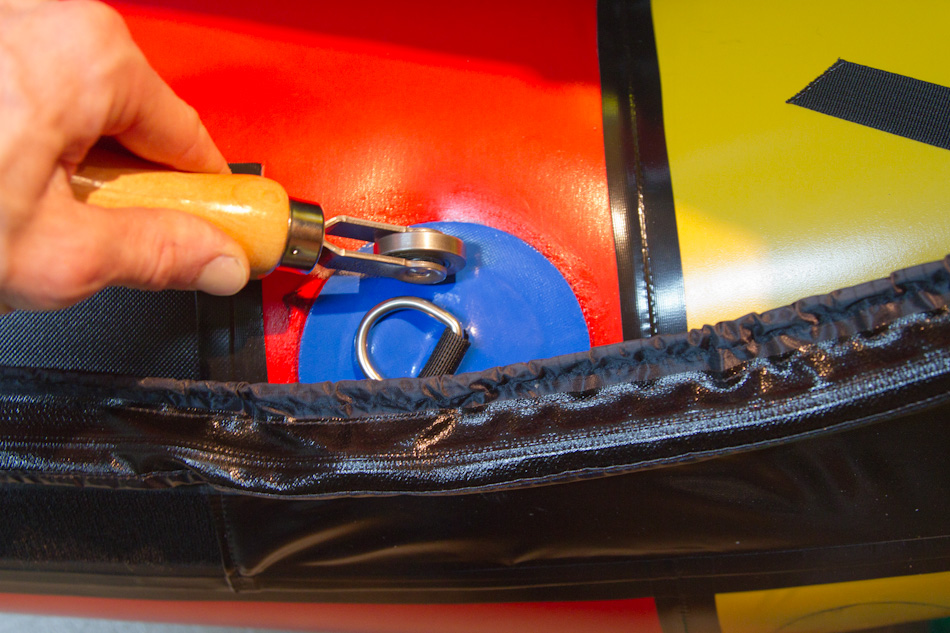
4) Re-activate glue. Do not skip this step!
Use a heat gun or hair dryer to activate the glue on both surfaces (boat and tie-down, Fig. 6). The glue only needs to get to body temperature. I wave the gun between the boat, the tie-down, and my hand so that if my hand gets too hot I know to distance the heat gun. If you see any blistering of the glue then it is too hot.
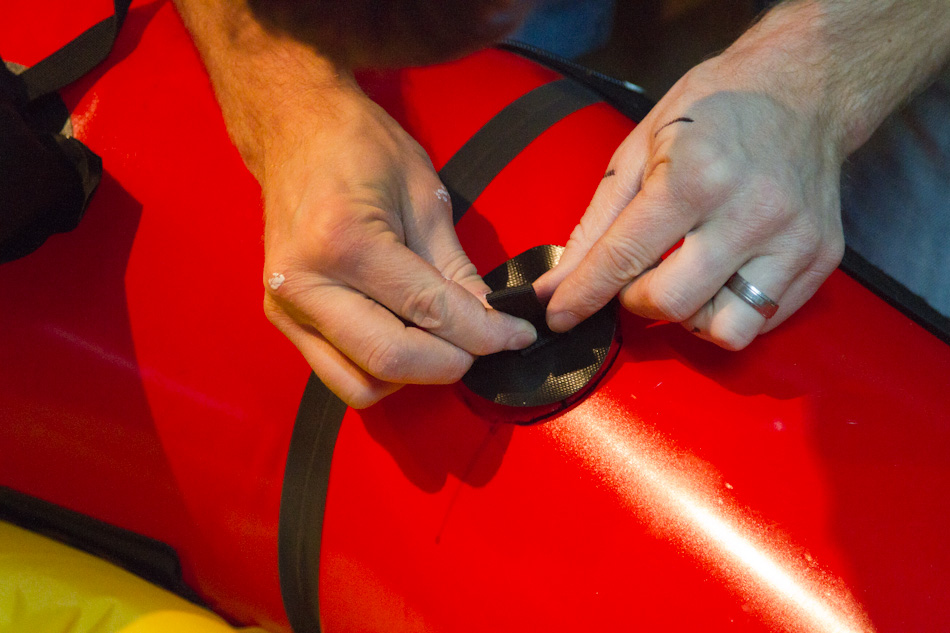
5) Attach tie-downs.
Position the tie-down by applying to one edge and rolling toward the opposite edge in an effort not to trap any air bubbles (Fig. 7). Use your orientation arrows from Fig. 2 as a guide.
6) Roll tie-downs.
Use a hand-roller to aggressively work the entire tie-down surface (Fig. 8). I’ve used the back of screwdrivers and other rounded surfaces but have been glad to have a real roller (available from NRS). If you are in Anchorage you should borrow mine.

Other modifications
Seat position: Moving the seat forward moves the center of gravity forward, which improves handling and control (compare with a kayaker’s center of gravity). I don’t use the boat’s rear seat-tie-in tab at all. I’ve got my seat ~8 inches forward so that both of the seat’s tie-in tabs barely overlap with the boat’s forward seat tie-in tab. This also provides a nice space for storage behind the seat. I clip my camera bag behind my seat.
Double seat: Due to the width of the boat, I need to sit tall to get good torque from my paddle. I use two alpacka seats, one fully inflated, one paritally inflated. Sandwich the mouth valves between the two seats (any hard object on the floor of your boat will promote wear).
Backrest: After destroying several inflatable backrests I am very pleased with a Jackson Kayak backband (though other brands would certainly work) clipped in at my thigh strap D-rings.


Check out the straps in action… Show Up and Blow Up videos
Thank you for this recent information. This has been on my mind for a little while but I did not feel I had reliable enough infomration to make an informed decision. The more I review your blog site the more impressed I become.
Just a random question, or request for advice.
I have been paddling for 20ish years and am a class V hard-shell kayaker looking to get into packrafting. I have been packing my kayak into remote creeks for for years and the thought of a packraft is very appealing. I have been waiting to make the jump in purchasing a packraft with there new boat tentatively coming out this spring, so the question I have is about there new Orca in comparison to the Llama since it seems you have paddled one of there prototypes. As with all boats I do plan on doing my own outfitting so any new modifications Alpaca is making in outfitting for the new boat are not as important than the design of the boat unless its something radical i have not thought of or something just plain better. I know a prototype can be different than the actual production model but wondering what your thoughts are about the Orca prototype so far in regards to weight, tube size (looks smaller) bow rocker (seems to be less than the Llama), length (trim adjustment), material ext.
This probably will not be my “go-to” boat for the town run or roadside stuff. I plan mainly to use it in conjunction with remote creeks and long distance multi-sport endeavors, at some point there will be a pack on the front of the boat so the bow rocker would come into play I think. Overall weight is a issue but compared to what I have been packing to kayak anything is better. I would be willing to sacrifice packing a heavier boat for better performance to some point.
As with my collection of kayaks at some point I will probably have a small quiver of packrafts but until then your thoughts on a “first boat”
Thanks
Kirk
P.S.
I have convinced my girlfriend (who is a throughhiker) to get a Llama for some longer trips I have allready started planning even before buying boat. With that said I will have access to a Llama to use but only when she is not on the trip.
Hey Kirk. I’ll send you an email with Tim’s address. He knows more about the Orca and comes from a hardshell background. I don’t like it. The thigh braces scare me and I don’t want the bulk of the frame on a long trip. For my needs, the Llama is the right white water boat. Right now my limiting factor is the boater, not the boat! I think all inflatables will fall short of hardshell performance in boiling rapids, so that there isn’t much reason to go Orca over Llama.
Wow luc. that is one tricked out ride. I’ll be really embarrassed if you ever see my 25$ homemade spray skirt.
Unlikely. I’ve seen the skis you build…
Where did you find the tube and one-way valves? Thanks for the info on the thigh-strap mod…working on mine now and its looking great.
The tube is stock from the hardware store… but the one-way valve came from an old inflatable life vest like those on airplanes. I looked to find a source… let me know if you have any luck.
Luc, check with my good friend and packraft innovator Carlos Pinzon in Camp Verde AZ at cdoutdoors.net for his source.
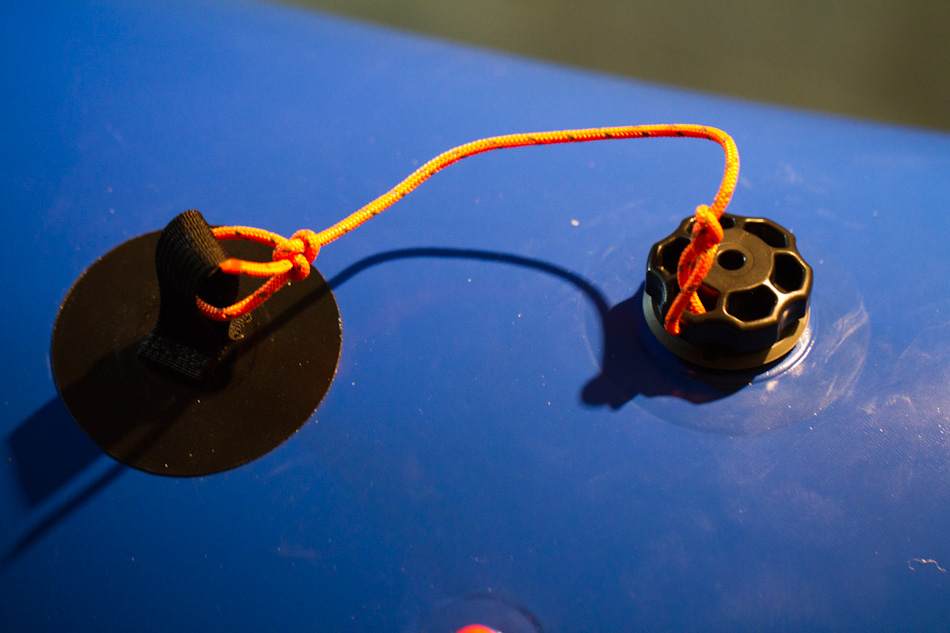
He adds the valves to a larger, fully dry bow bag he conceived with packraft material, a Tizip, and 4 clip on loops. The mouth valve permits the bag to be used as the 5th inflatable chamber required on some US rivers.
i carry my 4-piece spare paddle, first aid, groover kit, and extra layer in one with room left over for multiday packing!
You’ve convinced me. I’m going to take the leap and add some thigh straps.
Question: do you reckon the failure of the alpacka tie-downs while rolling is due to less surface area? I’ve been making my own tie-downs (for ski carry) out of an old urethene drybag, and can this make them whatever size I need. I do not plan on rolling, but I might as well make them bomber given the minute weight penalty.
Awesome how-to.
Hey Dave-
You won’t regret it- even with the ‘backcountry’ setup it makes a huge difference.
I don’t think surface area is a problem with the Alpacka tie-downs. Both of my blow outs were due to the stitching on the webbing loop. If you trust your webbing stitching, go for it, otherwise, $20 for her tie-downs and you are ready to go.
I’ve only heard from one guy that has used the ACE glue instead of Stabond. His tie-downs have held up, but without much use. Alpacka recommends the ACE glue.
-Luc
Good to know. The Alpacka jobs aren’t bartacked, just triple stitched. Different/more stitching should get the job done.
I’ve used both the ACE glue and (more recently) the Clifton urethene adhesive. Even though the Clifton fumes are icky (I’d only use it outside) it seems easier to get a good bond.
Great blog and list of mods – thanks! I’m about to install thigh straps in my Yukon Yak, and I have a question about rolling the d-ring patches during installation. When repairing hypalon rafts, I always rolled out my glued patches with the raft deflated (for more pressure on a hard surface underneath), but it looks like you rolled your d-rings with your packraft inflated? Is this because the Alpacka material stretches when inflated? Just curious, and wonder if it matters. Thanks!
Hi Mike- The guys at the raft shop recommended that we do all the packraft repairs with the boats inflated.
Hi Luc,
Thanks so much for this! I am currently installing the thigh straps . My next project is one of those stretchy one way hoses of yours. To install this did you put a hole in the boat and glue it in from the inside or attach it to the existing valve? Also, what brand is that valve?
Thanks a bunch!
Jeremy.
Hi Jeremy- I used a heat gun to loosen the original valve on the existing mouth-valve tube, then used aquaseal to glue tubing (from the hardware store) and the one-way valve. My one-way valve was salvaged from an inflatable pfd- like the ones on airplanes. I looked for sources online, but never found any. Let me know if you have any other questions! -Luc
Luc, looks like you have two rafts, one with the new kayak style spray skirt and one with the older velcro. Guessing the older one is set-up for more backcountry while the new style is for bigger water? I have a new style, primarily used for whitewater/day trips and after my first summer i plan to install thigh straps for sure. Wondering about the double seat, is that for backcountry? Seems like it raises the COG too much for harder paddling? Also wondering about trying to move my seat forward, seems like a solid upgrade if I’m already going to be playing with glue anyway. Did you glue it to the tubes directly or move the tabs forward as well and lace it in? Is your backrest sturdy enough as-is, or do you put a bag behind you? (seems like it would conflict with the idea of moving weight forward)
Great write-up, looking forward to next spring already!
Hi Ari- Thanks for the questions.
My old packraft is just a loaner now, the new one is too much better to not use, even for backcountry trips (check out the Logan Traverse photos- packraft as sled… and then I had dry feet in after 3 days on the water!).
Double seats: There is definitely a tradeoff with center of gravity, but I feel much more in control in the elevated position. I think this is largely due to getting more torque with my paddle strokes. Double seats is a very simple mod- you don’t have to glue anything. I have both seats laced through the front tab of the boat in a position where both the seat’s tabs are tied in… the rear two eyelets from the front and the front two eyelets from the rear. If that doesn’t make sense I can take a photo- but play around with it and you will see the position that doesn’t require any modification.
Backrest: I have a backrest laced through my thighstrap D-rings so that I don’t need to stuff gear behind it. I’ve been using a feathercraft backrest, but I shredded it this summer and will be putting in something with foam- like a kayak backrest. This won’t be an option for you until you put in the thighstrap D-rings. You can use extra inflatable seats or inflatable (airline) pfds to provide some support for the backrest, but it is a hassle. With my setup I can fit my Watershed camera bag behind the backrest which works really well.
Let me know if any of that didn’t made sense-
Luc
Luc, Thanks for the response. Also was curious about how you moved your seat forward…did you put new lacing tabs in, or just glue directly to the tubes? Wondering about putting velcro mounts in, think that would be strong enough to hold the seat in place?
Thanks again,
-A
Hi Ari- I didn’t have to glue new tabs in to move the seat forward. My boat has a rear lacing tab with 6 holes and a forward lacing tab with 12 holes. I’m not using the 6-hole tab at all. I have the edges of both of the seat tabs laced through the 12-hole boat tab. The front tab on the seat catches the first two holes of the 12-hole boat tab, and the rear tab on the seat catches the last 2 holes on the 12-hole boat tab. I wasn’t sure that this would be enough attachment points to secure the seats, but it has been solid.
-Luc
Instead of advance seat why just don’t choose a smaller boat.I’m almost 32 inch inseam and think about a alpacka (smaller one)for withewater ?what do you think (you and other advenced withewater budy) about sizing in packraft?
J-F
Hi J-F,
Some guys do prefer the smaller boats for a snug fit. But even in a smaller boat your center of gravity is pretty far back, especially when compared to the body position of a kayaker. My recommendation is to get the boat that ‘fits,’ then move the seat forward for white water trips. I’m 6’1″ (185 cm) and the llama (large) is the right fit. I move the seat back for long trips on mellow water, and forward for whitewater. With the seat back I can extend my legs straight. With the seat forward my knees are pushed up against the skirt and maybe even a little above the top of the tubes.
-Luc
Thanks Luc,
For info what’s your inseam height?
i’m 5 ‘10.5” but long thorso and short inseam(31.75”)185 pounds ,13 size foot.Seams weird to take the smallest alpacka but if i want a good fit for my inseam…
Do you know some people of my weight use the smallest alpacka in real withewater with satisfaction?
bikerafting possible with it(alpacka ,small size)?
J-F
Hi J-F,
I don’t anyone with your height in an Alpaca. You sound like a good fit for the Yak. The longer boat would be a little bit more stable, but the Alpaca would be lighter.
-Luc
J-F,
Im 5’10” with about a 31′ inseam. I use a Yak, seems like a pretty snug fit as is, feet are jammed in the front pretty well, but read that Roman actually got a bigger one (lama) and moved his seat farther forward to get same ‘wedge’ and move the COG further forward. Seems like a pretty decent way to go. Also get more flotation, but (very) slight loss of control with a larger raft. Yea sure, a little heavier, but for whitewater/day trips not an issue. Also would let you haul more.
Im seriously considering getting a llama and passing my yak on down to my gf. Always possible to use a bigger raft and use bags, thighstraps, adjust seat to keep you wedged in well it seems.
Just my 2 cents. Im sure others have put more thought into it than me…
Luc, your trip exploits are a source of inspiration! Keep it up. I wondered if I could ask you a question (or anyone else that can comment) about the new whitewater decks.
I have just mailed my 2010 yak in to Alpacka for a whitewater deck retrofit, and since contacting them to say I have thigh straps and that I move my seat forward (so that the seat tabs and the raft tabs lap over 4 holes), they are keen to customise the deck/skirt installation. However, they have not provided me with specifics as to how they would do that yet, and may wait until they receive my raft before doing so.
Did you get your deck/skirt customised for the forward seat placement and by how much? I would have though that the skirt should be modified, as opposed to the deck, by moving the “upstand” part forward by say 6 inches. Any thoughts? My old cruiser deck was ok for the forward seat placement but did leave a ~ 2-inch gap at the back.
Thanks in advance for any advice you can provide. I may post my query on packrafting.org too to fish for answers.
Chris
Hey Chris- I’d love to test out my boat in your NZ creeks!
I have my seat moved forward ~8 inches. I don’t think my deck or skirt needs to be modified, though my knees hit the combing at it could be slightly more comfortable if the deck opening was an inch or two forward. My skirt pops off on anything over class III, but that seems to be the norm, regardless of seat position.
I’d do whatever Alpacka thinks is best- I’ve appreciated all their suggestions and mods. Let me know what you decide… I’ll likely follow suit.
-Luc
Sounds good – I’ll let you know how I get on with Alpacka. Looking forward to my new deck in probably another (exasperated groan) month. And certainly, bring your boat down to NZ – it would be great to have you.
Chris
The new (whitewater) deck is big improvement (on the cruiser deck). Alpacka installed it a few inches forward of their normal installation position given my re-located (forward) seat position. My knees don’t touch the combing. I have done a few grade III rapids with it now and it has popped once I think. They sent me an inflatable backrest for which I glued tie-down patches. I am happy enough with this but on the look out for a backband now to try out. Cheers.
Hi, so i have one of the NRS pack rafts. Took it on 600 kilometer trip through Brazil last summer. Great boat, love it, however it does not have a spray skirt and i would like to be able to roll it. Any ideas?
I don’t have any experience with the NRS boats, but it sure seems like you could aquaseal/tyvek tape a skirt on. I’m not sure about rolling… you would definitely need thigh straps and a back-deck roll. The boat looks even wider than the Alpacka boats, which might make the roll unrealistic. Folks will be curious if you can pull it off!
-Luc
Try running continuous strap from foot tie down thru thigh tie down, connected to back brace and back down to other side. This way when you lean back the strap on thighs and knees will tighten, and as well you pull knees up and/or together it tightens back strap and sits you back forward… This especially makes a huge difference when rolling in tough conditions. Let me know if you have any questions and/or how it works for you. This is a modified version of what we do to ‘seatbelt’ or ‘quad belt’ ourselves into surf kayaks. But in that case we attach D-ring to bottom of boat between legs, close to croch and then run continuous 2″ webbing strap with quick release over our inner thighs/quads and around our backs. Even more effective, but only for paddlers that are super, super confident with their rolls and in situations where a swim would be much, much worse than being locked in your boat upside down for multiple, multiple roll cycles… JimGrossman@gmail.com. 2009 Masters World Champion Surf Kayaker
Luc, thanks for this page.
I tried the Alpaca for the first time this summer (Alaska, Arrigetch) and immediately bought one. As a hardshell kayaker, I immediately wanted to move my body up front, so I bought Yak in ADK4 version. Amaizing thing is – even before reading your page or any other similar pages, I did the same things – with lacing my seat, adding to seat height ( I used 1.5″ thick foam piece on the bottom instead of second pillow – I think it works even better) …
Next I set to add thigh straps…because I do not feel good without a roll and a good brace.
And here comes my question. After seating in the boat and checking all possible way of attaching the straps – and thinking
that I do not really like a combination of skirt and straps underneath ( of course one can exit – but how long does it take?), I came across an idea
of adding thigh straps ON TOP of the skirt. This is possible thanks to knee “caps” in ADK4 design. Holding down the straps (two friends helped a bit) to the suggested points – one in front, 2 at the sides, slightly up front from torso – I was able to hold the straps on my knees and use them for control and leverage. They seemed to work better than thigh straps on IK, because they are quite shorter. At the same time, straps were instantly off if I just relaxed my legs a little or pushed my feet forward. They are also automatically off whenever you are taking the skirt off, cause skirts lifts from the middle and that moves straps from the knees and to the sides.
If i decide to make this mod to my Yak, I’ll use straps of hypalon about 1 feet long and 2″ wide, with nylon straps to attachment point. Do you know if anybody had tested similar design before – and if so, what was a feedback?
There is another question: I really disliked the skirt… It seemed to me that even if this thin rail cannot hold a real kayak skirt, it still has to be something better – more flat, not holding a few gallons of water… Did anyone modified a skirt using the existing whitewater deck?
Regards,
Len
Hi Len- This sounds pretty cool and I’m not aware of anyone else experimenting with straps on top. But I can’t quite picture it. Did you glue on additional tie-down loops? Do you have a photo?
I’ve never had even a hint of concern about being trapped in my boat. I’ve got my straps as tight as possible and I still get sucked right out in the rapids.
I agree that the skirt needs work. It is much drier than the older designs, but mine won’t hold in class IV water. Let us all know if you come up with a better solution!
I’ll send a photo when it’s all done. So far just ordered loops and glue. Straps I’ll likely have to make myself.
First, thanks for you blog! It has been an inspiration and answered a lot of my questions.
I’m about to dive into the world of packrafts and am still looking for an answer to a few questions. Although I haven’t paddled whitewater much in recent years I was a competent class 4-5 paddler and cut my teeth on creeks and low volume streams. Because of a bum leg (motorcycle wreck) I’m a boater only, although I can walk or portage short distances… Just no backpacking. I see these boats as my ticket to remote places and boating world wide. This coming summer a north slope river and maybe the Happy or something Is in the cards. Next winter I have a few rivers in Southern Mexico that need my attention.
I’m looking at the new “Cargo Fly” option on current Alpackas and it both excites me and scares me. The idea seems super cool but I’m very concerned that it will let me down in some remote place. Any thoughts on this new system? Reliability? Repairability in the field … Like tyvek tape over the zipper? …. Is it worth it?
An aggressive forward paddling passion seems smart for a number of reasons… If I’m ordering a boat from Alpacka what should I ask for besides the ADP 4 spray deck. Are there other options that will help with getting the seat forward? Does the forward position preference hold true with the “Cargo fly” option… I suspect it would be even more important!?
I’m 5’10” with a 30″ inseam. With the forward seat and thigh straps, should I move up to the Denali Llama?
Any help you can throw my way would be super.
Bill
Seattle
Hi Bill- I think you should get the Cargo Fly and then design a kid’s motorcycle that can disassemble into parts that will fit inside the tube! I keep waiting for someone to make a longboard/packraft video.
Seriously though, I think the zipper boat is solid. It sure is nice to have dry gear and a lower center of gravity. Todd Tumolo and I did our best to test the zippers with big drops in Mexico, up to 30ft, and we didn’t have even a hint of failure. The attachment fabric on mine started to delaminate due to how I fold/roll my boat, but it was an easy fix, and I haven’t heard of anyone else having that problem.
I don’t know of anyone with the ADP4, but yeah, I’d go with it. I think the boats should come stock with the seat forward ~8 inches. With your kayaking background, you will definitely want it.
I think at 5’10” medium or large would work. The longer boat will track better, but be heavier. I really like being crammed forward, I’m 6’1″ and my seats are ~10 inches forward. It is a battle to get into my thigh straps. You should ask Alpaca for advice. They are very responsive and will be happy to make sure that you get a boat that fits your needs… maybe even with a motorcycle port!
-Luc
Thanks for the info.. Funny you should mention Todd. I played shuttle bunny…er, rabbit for Todd and Ganey couple of weeks ago when the were in Seattle. They needed a ride to the river so I stepped up. One quick bit of cold water befor hitting Mexico….
With the zipper I’m more worried about reliability over the long term and field cleaning and repairability. Nether Todd’s nor Ganey’s boats had zippers so I didn’t get a chance to inspect one.
Bill
I was thinking about the issues I’ve read about with keeping the spray skirt on in difficult water. There is a hack for loose fitting spray skirts I remember from years ago but can’t honestly remember from where.
Take a 700c or what ever inner tube or what ever fits, cut and re glue it so it fits tight around the cockpit combing with your sprayskirt on … Then Inflate. Make sure the grab loop is under the inner tube so when you pull it it pops off the tube. When gluing the tube together you can run it threw the grab loop so you don’t lose it in a swim and that way the tube is pulled as well when you bail.
Having not actually seen an Alpacka ww spray deck first hand I’m not sure if it would work. But It might so I thought I would throw it out there.
I don’t think it would be much more of a danger swimming than without as your already have a bunch of loose fabric around your waste and that is less than ideal. It would need to be weighted against the safety benefits of not having your skirt pop off is a bad spot or befor the crux move ..(assuming it works).
In years of whitewater and sea kayak paddling I have NEVER had an issue getting out of my boat. I have had whitewater boats that were outfitted so tight they were hard to get into and a bomber skirt that was hard to get on and took a real tug to get off…. Upside down with gravity and adrenalin on your side, I never even noticed.
Have you thought a custom made waterproof Lycra skirt with an adjustable shock cord?…. Might work.
Bill
Seattle.
Woah… I never thought of something like that, cool idea! Some guys use mini-bike pumps to keep their boats tempered in the water… so a tube would be easy to inflate. BUT wouldn’t you be nervous about getting strangled by the tube? I agree that popping out of the boat would be no problem, but then having a loop of material already around the torso… easy to imagine it getting bound on a rock/branch and caught around neck/body. Scary. Same justification not to tether paddles. I’d be more comfortable if it was a line of tubing rather than a closed loop; not sure how that would work.
The existing skirt system is great for class II, maybe III water, but I don’t even bother with the skirt for sustained IV, which is a real bummer. I hope they find a solution soon. I’d like to see a looser connection between the combing and tubes, something that would give/accommodate while the boat is flexing.
It seems the urethane patches that nrs used to sell doesn’t exist anymore. Could the aire pvc patches be used instead? I’ve had terribly bad luck with stabond glue, have you tried the clifton?
Patch: http://www.nrs.com/product/1468/aire-1-pvc-d-ring-patch
Glue: http://www.nrs.com/product/1901/clifton-urethane-adhesive
Yeah, I think the AIRE D-rings will work. Urethane or PVC will work, you just want to avoid the ‘Pennel Orca’ (hypalon). Did you see the pack-raft specific D-ring (urethane)? We installed some in India, the extra surface area seems like a good idea.
http://www.nrs.com/product/16305/nrs-packraft-d-ring-patch
As for glue… are you heating the Stabond with a heat gun? I’ve helped kit ~25 boats with Stabond and haven’t heard of a single glue failure, usually the tie-downs rip instead. BUT, Clifton should be fine. I think Alpacka prefers Clifton.
Thanks for the heads-up on the dead NRS link, I’ll update it.
-Luc
Not having seen those NRS packraft D-rings in person, do you think there strong enough for thigh strap attachment points?
Bill
Yes, I think so. The surface area will help, and the webbing loop looks bomber. But I haven’t seen any given much of a test!
Thanks!
I might try the nrs packraft patches instead, the 5″ diameter seems quite nice as you said.
I used a hairdryer with the stabond last time, and couldn’t get a good bond. The second time, I achieved a slightly better bond, but my girlfriend uses that boat now, and she doesn’t roll and only uses that patch as a drybag attachment point, so it’s good. For my new boat, I would like to have reliable roll-able patches. I’ll try the stabond again, since nrs doesn’t sell the clifton 2 part and I have a local store that can order from nrs without incurring exorbitant fees.
Hope this goes well!
I think the re-heat activation of the glue is the most important step. The luster of the surfaces should change from dull to glossy. Not sure where you live, but both REI and West Marine can get Stabond as well.
Hi Luc,
Ok, one virgin Packraft in my living room floor and some decisions to make. I have a Denali Llama with the ADP-4 skirt placement and heaver than standard deck fabric. I have 6 PVC D-rings on order from Cascade outfitters and I’m thinking about placement. So in a perfect world, where should the backhand be?
I’m guessing as far forward as i can get it. I have the Cargo Fly option as well and I’m guessing when packing the tubes the weight will be farther back and more centered than having a pack strapped to the bow. With just a quick sitting in the boat with seat in and new sprayskirt on with knee bumps, it looks like i can get the seat to where the very back of the seat is ahead of the tube transition (yellow /red) your overhead photo by about an inch. It looks to me like yours is maybe a couple of inches behind? This is without it being laced in and can’t be as the tabs don’t overlap at all now… I kinda think thats an oversight on there part as if your going to move the cockpit 4 inches forward the seat lashing tabs should be moved as well.
Still trying to decide on a backband..
Have you or have you heard of getting the seat too far forward and having issues?
Anything you would do differently given a clean slate?
Bill
Hi Bill-
I’d rig up a new boat like I have mine now… the biggest issue for me is the skirt popping off, but I don’t think anyone has solved that problem.
I’ve got my (kayak) backband attached to the same D-rings as the thigh straps; in this position leaning back even helps tighten the thighs, an added bonus. The backband should have enough adjustability that you can tighten or loosen to match your seat position. Jackson’s big band is too big, Dagger’s is too bulky. I saw a really nice Pyranha (soft, light), but don’t see it for sale online. IR might be a good option?
My seats are threaded through the more forward tie-in-tab that is attached to the boat, I don’t use the rear tab at all. I use first and last sets of two holes on the boat’s tab… the seat’s rear tab is tied into the rear two holes and the seat’s front tab is tied into the front two holes. Sounds complicated, but it should make sense when you lay it out.
I haven’t heard of anyone feeling too far forward. Good luck with your virgin!
-Luc
Hi Luc,
Would you mind posting up a picture of how you have attached your Jackson Backband to the D-rings? I’ve got all the ingredients in front of me, but can’t visualize how to attach the cleats so I can adjust the seat.
Thanks!
Tam.
Done. Center at bottom in the cluster of 9 modification photos.
Have seen two of the NRS packraft patches fail. The black webbing rips off/out of the green, er, fabric.
Both were on boats that are aggressively rolled. Both were at the hip position.
I’ve been paddling various prototypes of the Diva for the last ~year. Zero issues with skirt popping in the hardest stuff I’m willing to run, yet no issue pushing out when I fail to roll up. So to say, Alpacka is listening and working to address the skirt-poppage issues on the mainline boats. Trickle down should be happening soon…
Same here MC. Just had two NRS packraft patches blow in Grand Canyon at the hip position. Black webbing ripped out. Piece of crap. Warning to all – stay away from them. NRS should be ashamed, and now I’m stuck where I can’t remove the failed patches. I’m looking for another hip location to install Aire patches instead.
I was able to carefully remove blown patches by using the heat gun and frying my fingertips. But it is scary.
Hey Luc, just a note of thanks. I use the ‘white knuckle’ heat gun approach and successfully removed the failed NRS packraft patches. I used a pair of pliers to pull hard on the patch after getting an edge to lift from heat. WHEW!
Thanks to this thread I’ve just ordered a bunch of stuff to install a footbar and thigh straps on my Denali Llama. I am 5’9″ and I somewhat stupidy bought the Denali Llama thinking I wanted the extra cargo capacity. I was stuffing a drybag up in the bow as a foot rest but decided to install 2 Alpaca strap plates and then get a custom sewn footrest/bar made which will strap on to the strap plates. I’ve also just ordered to NRS urethane D-rings and can of Clifton Urethane adhesive. I’m going to mount that were Luc did so as to attach the thigh straps and maybe a kakay back band should I feel the need to later. I also plan to send the raft into Alpaca at a later date to install the W/W spray skirt. Oh my hurting wallet. I’ve also got a Feathercraft Baylee 1 as well. Damn addictions to watersports! Thanks Luc for inspiring all of us new packrafters! Scott
I’ve ordered a Denali Llama and am looking to order some d-rings to put in thigh straps as demonstrated by Luc. It looks like some of you are suggesting the Aire d-rings over the NRS. My question is whether the 4 inch diameter Aire circular patches are large enough to hold the force of rolling (the NRS have a 5 inch diameter) or are people buying the larger 1.5 inch Aire triangular d-rings, and if so, do they still fit properly on the packraft tubes. Luc, thank you so much for putting this site together, I have visited here countless times and really enjoy watching your videos.
Hi Chris- I think people are just getting failures in the NRS packraft-specific D-rings. The standard NRS urethane D-rings are bombproof.
Thanks Luc, of the two standard NRS D-rings would you recommend the 1 inch D-ring (4 inch diameter patch) or the 2 inch D-ring (6.5 inch diameter patch).
1 inch. 2 is overkill.
Hey Luc, thanks a million for this write up. I went with aire d-rings for the straps and pack raft patches for the ski attachments on the outside. You were right on, the heat activation is crucial with the stabond. I hit both surfaces with an old blow dryer before joining them and again a little bit after to make sure the edges smoothed out. Also, if you’re cheap, you can just rig a cam strap with a bit of foam pad wrapped around it for a back band. I’m 6’4, so no moving the seat forward for me…
Just curious though, any reason you went the stabond route over Clifton? This was my first time using it and it seems bomber, but I know Clifton is solid as well from being able to glue on raft handles and pick a 16′ boat up with them 5 minutes later.
Cheers!
-Hunter
The raft shop that first helped us install thigh-straps used Stabond, and I’m loyal to it because it hasn’t failed. I’m not motivated to try other options when I fully trust Stabond. I’ve seen the vinyl adhesive fail, but have only heard good things about Clifton.
Hey Luc! Been meaning to reach out and say hello for a bit, now with a good reason: I’m bikepacking my way from Alaska to Argentina, and now added a packraft to the rig. With little to no whitewater kayaking experience, I’m hitting up every rafting group I can for knowledge and skillz… next on the list is practicing the roll. Impossible without these straps as far as I can tell. Plus I’m getting frustrated with having no leverage with my legs in the raft. So I managed to get 4 of the Alpacka tie downs brought down by a friend. Now to glue them on… I can’t find the loctite glue nor the other glue you suggested down here. Any insight on what categories of glues work best so I’m not bound to a particular product? I spoke to a local raft guide here who said the PVC glue he had wouldn’t work well with vinyl/urethane materials. I have some seam seal with the quick dry agent with me, as well as loctite outdoor epoxy. Not sure if I should look for something else or try to work with what I have… Any thoughts?
My first thought is to check with the guys at packfafting.de (http://www.packrafting.de/2011/09/tiedowns-richtig-ankleben.html) in case what they use is also available in South America. If that doesn’t work, I’d try the two-part glue the rafting companies use (be sure to use a heat gun to re-activate it), or just go straight to aquaseal. I think aquaseal will work for low-torque applications. If/when it peels off, not a big deal.
I definitely recommend trying to get straps installed. You really can’t edge without them, and you need to be able to edge to get in and out of eddies when the water gets swift. The straps are like bindings on skis that allow you to edge the ski. But I wouldn’t put much effort into learning to roll. I think rolling a packraft is a bit of a party trick (though it is much easier in the new Alpackalypse boat). I’m ~50% likely to hit my roll, after a ton of practice. The only guys that can reliably hit their roll are solid kayakers. But we have an advantage over kayaks in that we can do a wet re-entry, so I’d spend time practicing that. I can usually get back in my boat in about the same time it takes a kayaker a second attempt at a roll.
Your trip sounds awesome, I hope it goes well!
Hey Luc, I’m an ex-kayaker and C-1 paddler, and badly miss a better connection to the boat, so am installing thigh straps. When you use an Alpacka patch for the front anchor, are you using their grab loop or the strap plate? Thanks
I have the grab loop installed, but the strap plate could work just as well. I think I heard that the loops are rated for higher stress, but I’m not sure about that. They have worked great for me, I’d go with loops.
You will love having thigh straps!
Hi Luc, thanks for a great article and all the feedback. Really helpful!
I’m just about to fit the thigh strap setup provided by packraftstore.de.
I used to have a Yak (I’m 5” 11) but decided to move up to the Llama for the extra bouyancy and then fit a foam foot block for whitewater sport boating.
I’m just wondering if it’s worth fitting a kayak style backband and moving the seat forward considering the boat I have is the new style with the extended stern?
Sorry if this hasn’t already been answered.
Regards
Tom
Hi Tom-
I recommend a kayak blackstrap regardless of the boat size. As for moving the seat forward, you will probably get a feel for it after paddling a bit. I think ideally the boat sits flat in the water, so maybe get a friend to check your profile in the stock position vs. scooted up a bit. I bet with a backband you will feel good in the standard position.
Hello! What a sweet post. I used it to put it my own thigh straps in the exact same raft. I also noticed after my first paddle with the backrest and straps that I was sitting too low in the boat. Does their new seat solve this problem? I know it’s bigger length wise as it extends towards the knees but it’s the volume that much larger vertically?
Thanks for posting this!
Hi Alex- I think the new seats are roughly equivalent in height to 1.5 of the old seats. You could experiment with stuffing something under your seat (sleeping pad, empty pack, etc.). Even with the new Alpaca seats… I wish I was a touch higher. But other folks like the height as-is.
Awesome thanks for the reply. Did you use an explorer seat for the bottom seat?
Yes, I think the bottom is an explorer seat.
Hey Luke,
Thanks for this post, very helpful for getting thighstraps on my Llama. After a two years of paddling whitewater in it I just bought a Wolverine, and now would like to replace the metal D-rings tiedowns with Alpacka tiedowns to bring the boat closer to its original weight. Do you have any tips for removing tiedowns attached with stabond? Should I just get in there with a hair dryer and a butter knife? Also, when I glue in the new tiedowns, do you think I’ll need to apply the MEK again?
Thanks!
I’ve removed torn attachment points with a heat gun and rounded blade (like a butter knife). It was hard on my finger tips (the heat), but came off with some patience. Just start slow (less heat) and get a feel for how much you can remove without getting the boat too hot.
I believe you should use MEK before any glueing. It etches and prepares the surface for the new tie-downs. You will want to use MEK on the tie-down anyway.
Thanks Luc
how do you take your shots on the water? with the dslr? Worried about my camera getting wet in constant rain / river conditions. Thanks
I use a go pro for stuff in the water. I like the idea of using the DSLR, but am not willing to pay/carry waterproof housing.
Hi
Your tips on setup/tuning position have been very useful to me, thanks! Since you’ve been paddling the new Expedition (I’ve only been in a Yak), how do you find the factory setup is in those? Do you feel the seat position should also be moved forward (and higher)? Or is the factory placement to your liking?
The new seats are taller, so no more double seat for me! The Wolverine is a snug fit for me, which I like. The Expedition is 2 inches longer, better for long trips, not as good for whitewater. But pretty subtle. In the Wolverine I don’t use the toe-pillow, plenty snug without it. But I have long legs.
I just got a YAK. I am 5’9″, 30″ inseam 165lbs. The boat fits me, I could probably fit in a Alpaca.
– Do you think there is any advantage to 3 or 4 pt thigh straps? I wanted to go 2pt because it means lightweight backcountry straps are an option without any additional attachment points.
– I ordered the NRS padded 2pt straps, they look nice but have a heavy duty cam buckle I might need to replace. They weight 1.2lbs as is, and seem like they might absorb water.
– Alpacka sold me their double d ring patch for the hip.
– I am worried about the placement there. It seems like you want the attachment point for the thigh straps pretty far back, and you want the attachment for the back band forward so you have some room for adjusting it. Seems like the sweet spot is actually pretty small. How do you find it?
The advantage of a 3 or 4 point thigh strap is that it will do a better job of holding your knee against the tube. This is not critical, but is better.
I wish those NRS straps didn’t have the huge metal cams! You might be able to find a pair of AIRE straps that still have the plastic buckles. I don’t think the NRS straps will absorb water.
The best way to judge placement of the hip attachment point is to look at the photos above (Fig. 1) or photos of the boats on Alpacka’s website, or a friends boat. I think something in the hip zone will work, and isn’t as narrow a margin as you anticipate.
Good luck!
Also, which backband should I get, that Jackson one isn’t available. I have the inflatable Kokopelli backrest, I see you have that in one of your pics, do you like an inflatable backrest, or is there an advantage to the foam ones?
I popped several inflatables, which was my initial motivation to switch to a firm backrest. You do get more support, nice in whitewater, but again, not critical. The lightest option might be to buy the backrest from Alpacka. Jackson and the other kayak companies are using larger bands.
Following up here:
I found an inflatable backrest (an old Kokopelli) and a cheap foam one from Aliexpress (12 bucks, seems great)
I installed the double d-ring patch from Alpacka. I’m not happy with the location of the patch. I put it in a similar location to some of the photos, but it looks like it’s a couple inches highter than where Alpacka installs it. This makes the thigh straps ride up towards my knee, rather than staying low on my inner thigh. There’s a big difference in control between those two positions.
Have you ever removed a patch installed with Stabond? I’d like to move it 2″ down, not sure there’s a way to do that?
I have some fabric from DIY packraft I could use to glue on repair patch on the area where I would have cut it off.
Thanks,
Robin
Hi Robin- I’ve removed a few tie-down patches. It is possible, just kind of a pain.
Use a heat gun to heat up the tie-down and use a blunt object to start working away at the edges. The best thing to use is your fingers because if the patch is too hot for your fingers, you need to move the heat gun away ASAP. But something like a plastic tire lever might work as well. I wouldn’t go anywhere near it with a screwdriver. Work slowly to peel the patch off incrementally.
My concern when doing this is that the gun is getting nearby seams/welds too hot.
You will likely leave a rough texture of glue on the tube, but that isn’t an issue since you know you want to put a new tie-down in a different position.
One other thing to consider… you might explore with what a 3rd/4th tie-down in the knee positions would do… if you can recreate something like Alpacka’s 4-pt thigh straps, you would be even snugger in the boat. Perhaps the 4 pt geometry works with the hip in a high position?
Have you seen any good tutorial on how to modify those Aire/NRS padded thigh straps adding additional attachment point?
Do you mean to turn the 2-pt into a 4-pt strap? I have not. I used the Aire straps as 2-pt for years and thought they were great.
Yes, they are great, just wishing my attachment point was a little lower. https://youtu.be/1SCEe9Y9m48?t=150 In that video it looks like if I can figure how to modify them to add another attachment point it should help…
This is going to sound hacky as it gets, but an electric popcorn maker w/o the top cap makes a great heat gun in a pinch 🙂
(don’t ask me how I know this….)
Brilliant!
Luc, loved the skating videos. I’m a former speed skater in MI and competed with Paul Mehl (not certain of his spelling) Any awareness of family in metro Detroit, MI 1960s… speed skater?
Doug
Luc,
Hoping for some advice regarding my self-belier Alpacka. For times when I am on flat water and want my boat to track a little better, I was thinking of running a strip of Gorilla tape over the holes inside the floor. Then, when I want it to be self-bailing on faster water, I would remove it. Have you ever done this? Is there a better tape to use that is removable? Thanks for any help!
Sorry Ken, I don’t have any experience with the self-bailers. I bet you will get good feedback from some of the online forums/communities.
MEK, Methyl Ethyl Ketone is hard to find in Alaska hardware stores, due to it’s health effects.
Have you tried any other preparation solvents before using Staybond?
I also have not been able to find the Loctite vinyl fabric plastic adhesive here in AK. Alpaka won’t ship to Alaska due to haz-mat shipping regs.
Any help on finding these?
Hi Bob-
I don’t think there is anything magical about MEK as a chemical etching agent. I wouldn’t be surprised if fine sandpaper would accomplish the same thing. That said, I’ve seen ‘MEK alternative’ or ‘MEK substitutes’ in a few shops … maybe even Home Depot. I see an Ace Hardware option here:
https://www.acehardware.com/departments/paint-and-supplies/chemicals-and-cleaners/paint-thinners-and-solvents/1474469
If in doubt, you could ask the folks at Alaska Raft and Kayak. They sell the glue and used to sell small vials of MEK.
The vinyl adhesive might also be available from Ace:
https://www.acehardware.com/departments/paint-and-supplies/tape-glues-and-adhesives/glues-and-epoxy/1490796
Again, I don’t think there is anything magical about this brand … other vinyl adhesives should work just as well.
Good luck.
I saw you from afar on Portage … sorry we didn’t get a chance to say hi.
Hi Luc, do you know where to get straps with lightweight (non-metal) buckles, as seen in your “backcountry thigh straps” photo here, and also in this video https://youtu.be/weXGgembz7A?t=106 ?