

I wear backcountry ski boots in places where folks don’t expect to see them—cross-country ski trails, ice skating, and ice climbing. “What’s the deal with those big boots?” The deal is that they are a great option for all-around winter use.
Backstory: I was born with slightly deformed feet. My feet don’t absorb shock like they should, which has put me on the advanced track toward worn joints. At ~25 years old my big toes were shot, which required surgeries and ultimately the inability to wear soft-soled shoes. My salvation has been rigid-soled backcountry ski boots … for everything. I’ve covered over 7,000 miles on ski boots and learned a lot about how to make them work along the way.
You might not need the modifications that I describe here. My wife Sarah uses the same boots for most of these activities but without needing any modifications.

What’s a backcountry ski boot?
Backcountry ski boots (also referred to as A.T. or touring boots) consist of a rigid plastic shell and removable foam liner. Unlike downhill boots, backcountry boots have a lockable ankle hinge. ‘Walk mode’ allows the ankle to flex while walking, and ‘ski mode’ locks the ankle for better power transfer when making downhill turns.
Boots come with different lock mechanisms, buckles, and binding attachments. I’ve only ever used “tech” bindings, e.g., Dynafit, which require steel divots on the boot toe and heel. But that’s probably what you want too, if you are reading this page.

Warmth
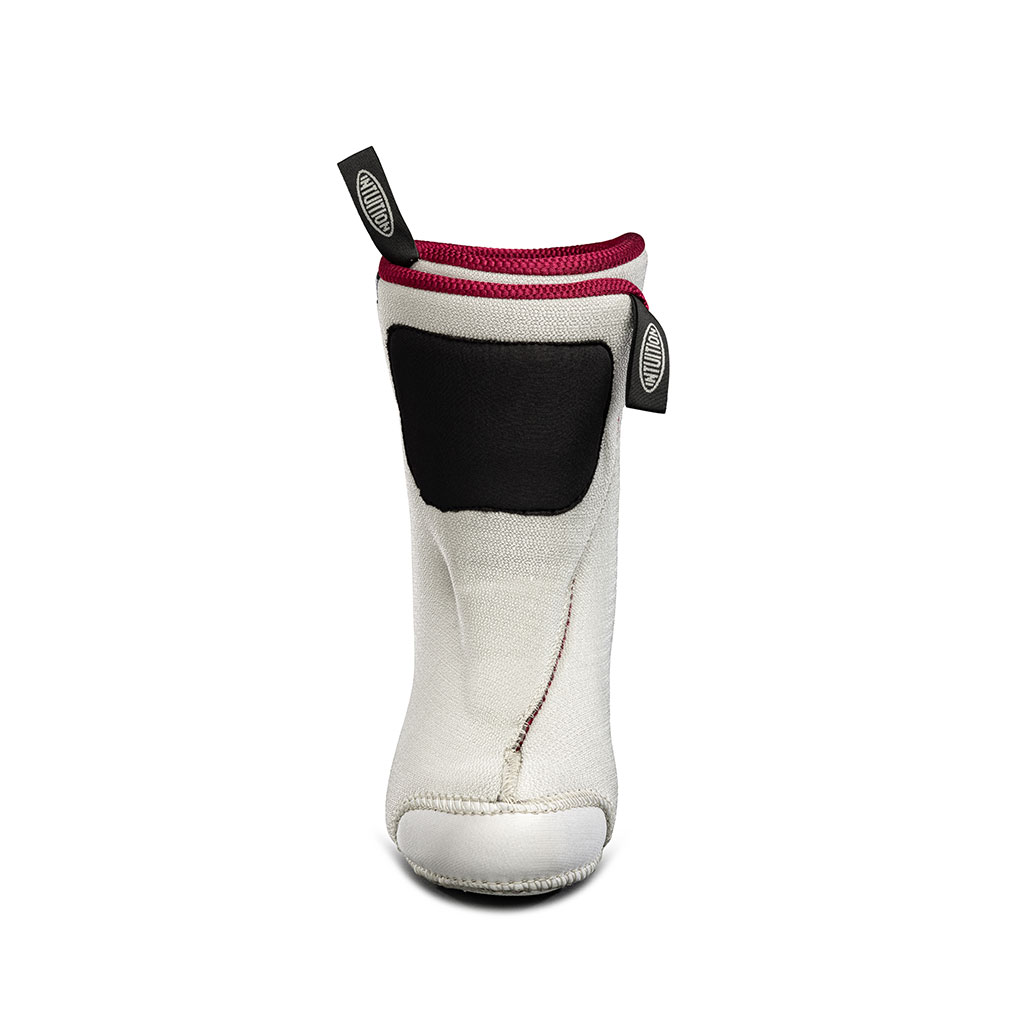
For my arctic and high-altitude travel, foot warmth has been critical. I’ve found after-market liners to be warmer than stock liners … even when the stock liner is made by the same brand. I have the most experience with Intuition’s Pro Tour model.
Even for trips closer to home … these boots are much warmer than cross-country boots or ice skates. And if there is any chance of the boot getting wet … the removable liner is much better for managing the water.
- I don’t heat mold the liners. Ski shops and DIYers will heat the liner to mold it to your foot. In my experience, heat-molded liners pack out sooner and are then less warm.
- I wear a sloppy fit. I spent years in ‘performance fit’ (tight) telemark boots with chronically cold feet and daily chemical heat packs. Since switching to sloppy backcountry boots, I have not needed heat packs. I still wear snug liners at the ski resort for better ski control, but wear loose liners on remote trips, where I can’t afford a cold-exposure injury.
- I wear a single pair of thin socks that I swap out during the day. I know this is not common practice, but it works for me. Refer to the moisture management discussion below.
- Additional insulation: For Denali, I carried Forty Below’s neoprene overboots. I did a poor job cutting holes for the toe and heel attachments, but once attached, the overboots worked great. It would have been a mistake for me to try Denali without overboots.
Moisture management
Moisture management can make the difference between warm or dangerously cold feet. Liners can get wet from overflow and river crossings, but more often, by sweat.
Moisture management is also important for preventing blisters (see below). I benefit from drying my feet during long breaks, even if I put wet socks back on at the end of the break.

Liners
In addition to their insulative value, closed-cell liners don’t absorb water. Hooray! Most liners have a fabric layer over the foam for comfort and durability, and this layer does absorb water, but the moisture can be managed by airing out the liners.
- Driving off moisture during the day: During an extended break, I remove my boots and pull out the liners to help them ventilate (we often hook them on the tops of ski poles). These breaks help dry my socks too.
- Driving off moisture at camp: When I arrive at camp I loosen the boot buckles and pull up the liner’s tongue to help drive off moisture while I’m doing camp chores. I wear the boots as long as possible (until my feet start to feel cold). I prefer tongued liners instead of wrap liners for this reason … it is easier to ventilate the liner (refer to the side-by-side images below, tongue on left, wrap on right).
- Drying the liner: Some people dry wet liners in their sleeping bags during the night. This sucks. The liners smell bad and the moisture transfers to the sleeping bag. But, it guarantees warm liners in the morning. By driving off as much moisture as possible at camp before bed, I get away with just letting the liners freeze each night. Another option is to fill small water bladders (~0.5 L) with hot water in the morning and place the bladders in the liners to start thawing the toe box.

Socks
I prefer thin socks because they dry quickly. In effect, I’m choosing moisture management instead of insulation. I’d love to know how much insulation thick socks really add … it can’t be significant compared to the liner.
I typically swap out my socks every four hours to flush out moisture. The wet pair goes on the outside of my pack or under my shirt, depending on the weather. I dry my socks during the night by draping them around my torso under my baselayer. Another trick is to wrap wet socks around a bottle of hot water—the heat helps drive moisture out.
Specifically, I like Sockwell’s moderate-compression calf-high socks. The compression helps to limit muscle fatigue. Full-compression models are too hard to get on and off during the day and I end up ripping holes in them.

Blister management
Prevention is the name of the game. As soon as there is a hint of a rub or hot spot, I take the time to tape the foot. It can be hard to call for a break if we’ve just started moving, but the other option is worse—we once had to turn around during an expensive remote trip due to a partner’s blister.
I’ve used different techniques to manage blisters and Leukotape P is the clear winner. The tape works best when warm, so I carry a chunk in an inner pocket (wrapped around a lighter or similar). Allow the foot to dry, tape the area of concern, and then rub the tape to help the adhesive stick. Taping at night is even more effective—the adhesive locks in during the night.


Fit and comfort
Whenever I struggle with tender feet, I’m shocked by how debilitating the injury is. I use two strategies to accommodate pressure points: heat-punching the shells before the trip and cutting the liner during the trip.
Boot punch
I use a homemade punch and heat gun to deform the shell to match my weird feet. It would be better to have professionals do that work, but I am frugal. Here is my process:
- Wear the boots and mark pressure points on the shell.
- Use a heat gun to warm the pressure point for a few minutes. If the plastic gets glossy, the gun is too close.
- Place the clamp on the target point with significant pressure. This is tricky around buckles, hinges, and the toe box.
- Leave the clamp in place for a few minutes while heating a spot on the other boot, alternating between the two (for efficiency). The same spot might need multiple rounds of punching.
- Wear the boots on a long day, evaluate the fit, and repeat this process. Iteration is critical.


Cutting liners
Even with punching, I can still develop pressure points on long trips. During the trip, I remove foam from the inside of the liner.
- Wear the liner and mark or hold the pressure point.
- Use a sharp blade to cut a circle through the inner liner fabric around the point.
- Press the point from the outside in, and shave some of the inner foam. I’m trying to thin the foam, not remove it all, but in some cases, I’ve needed to cut through all of the foam. This is typically an iterative process.
Surprisingly, I don’t experience cold spots where I’ve cut the foam. I usually experience instant relief that lasts the rest of the trip. The point is … don’t be afraid to hack away at the liner.

Boot features
There are a few boot features that I pay special attention to. To be honest, I’m not up-to-date regarding modern boot options, so these considerations might not apply to you.
The cuff hinge
I think the emphasis on ankle range of motion is somewhat misguided. True, a greater range of motion helps with kick-and-glide, but equally, or more important, is the resistance of the hinge. I feel most comfortable in old boots with worn-out hinges. I’d consider buying well-used boots instead of shopping for a new pair with a stiff cuff.
Walk/ski lock mechanism
Some boots have a single mechanism that sets the boot in downhill mode with forward lean and locked ankle. This feature is great for fast transitions—which are never my priority during a long trip. I prefer having a few buckles on the cuff so that I have more control over the fit. Adjusting the buckles throughout the day helps me transfer pressure to different parts of my tiring foot. Ice skating, nordic skiing, and ice climbing aren’t options with single-mechanism boots.
The green boot in the photos below has a more adjustable cuff (two buckles). The black and white boots have a single mechanism that tightens the cuff and locks the ankle.


Power strap
If possible, I remove the power strap for long trips; it is just a hassle. I’ll bring the straps (or use ski straps) when making turns is the priority. The black boot in the photos above has a power strap.
Crampon bail
I bought a pair of used ski boots (Dynaifit Hojis) and was shocked to discover that they didn’t have a toe bail for a crampon. What the hell?!? The workaround options are terrible (I tried one … but wasn’t willing to drill through the boot sole to install the step-in option). The black boot in the photos above does not have a crampon toe bail.
Durability
I love shaving weight, but durability is important to me when it comes to footwear. I’m more inclined to take a tried-and-true heavier boot than a hot-off-the-press unproven model. Nothing matches actual testing by logging miles.

Great post, as always Luc, full of useful tips and good insight.
You seem like you’d be the perfect person to encourage Ermine Skates to set up a system to easily mount Dynafit binding and to include a spring mechanism (as found on clap speed skates, for example) to prevent the heal from dropping as we skate.
They’ve already got a slick mounting plate accessory prototype that accommodates the tech toe bindings. Not sure if they are pursuing a spring mechanism but I’ll pass on the request!
What Skis are you typically using? Also: avalanche airbags?
In the backcountry? I have Fairweather Ski Works skis—cool company, friends. But I use this same setup on my nordic skis and skate skis.
I don’t have an avalanche airbag. Maybe someday … but I’m largely taking a break from avalanche terrain these days.
Any kind of balm works well for me: badger balm, etc.
Yes … we used to do that before the Leukotape era. The bummer with that solution is that you can’t follow up with tape … it’s one or the other. We were using ‘unpetroleum jelly’ back in the day.
I once had several pair of Kong Grimper trekker skis with special bindings that could attach my 2 lb/pair rigid foam-soled wire-laced snowboard boots. They were great, with little learning curve. It was nice that I could ski down the cruddy steeps with a $200 pair of boots that worked as well and were as light weight as top performing $2,500 skimo boots. Not to mention that it was no big deal to do an eight mile hike in those same boots.
The universal bindings that are commonly attached to common trekker skis are no good for rigid soled boots, and the straps are too short for my size 12 ultralight wire-lace snowboard boots, anyway. The solution to fix that is so simple, but I get ignored when I request a change. How could they not want to produce the best performing backcountry ski binding on the market, just by moving the hinge forward and lengthening some straps by an inch or two?
Hey Luc!
Why aren’t boots with the single locking mechanism good for ice climbing or Nordic skiing. I feel like when I’ve skate skied with touring skis I’ve wanted things locked up. But I’m not a real Nordic skier. I’ve used crampons on glaciers and typically I’m in walk mode. I’d like to understand this a little better.
I heard from a friend that used to guide Denali to look for boots that have tongues that fold out… three “Cabrio” piece boot style, not typical two piece boot style. Is this something you’re concerned about?
Also what are those green boots?
Finally, I love you’re boot stretcher! I have weird wide feet as well and have resorted(!) to doing a bunch of my own punch work. I’ve got something like this I use: https://footfitter.com/products/footfitter-premium-professional-western-cowboy-boot-stretcher The only problem is that I can’t get at the true toe of the boot. I had some boots professionally punch out the toe and it made a big difference. Can you’re gizmo get at the toe? Are there add-ons to get at the toe.
Thanks again for such a great post!
The issue with the single mechanism is that it locks the ankle with a forward lean. The lean is good for making turns but nothing else.
I don’t think I’ve ever seen a two-piece boot … maybe this is the ‘out of date’ part that I mentioned. Or maybe most backcountry boots are three pieces? I just want to be able to get the liner in and out easily.
I think the green boots are old Dynafit ZZeros or Green Machines.
My boot punch doesn’t do a good job at the toe box either, and that is probably the biggest limitation with my DIY system.
Hey Luc! I guess I’ve heard resort style alpine boots called two piece because they don’t have the tongue.
I haven’t used one of the Hoji style one locker boots. It sounds like they lock the ankle AND the forward lean. Sounds like that’s what you’re saying the issue is. It seems like that would even be tricky to do glacier travel with crampons with.. again never used that style of boot.
Thanks again for the post!
You can tighten the Hoji cuff a ways without locking the ankle (the Hoji model that includes a crampon toe bail) … I bet it would work fine for glacier travel but not be as good for vertical ice. Certainly someone knows what those boots can do …
Thank you. That was valuable. It was great.
Hey, another tip for moisture management. Antiperspirant, on your feet, specifically “carpe” invented by some people that had uncontrollable sweaty palms. Thanks for sharing so much of what you do!
Wow, this information could not be more perfect for my current needs! I also have deformed feet and need rigid-soled shoes to prevent my toes from bending. I’ve been in the process of deciding on a nordic-style skiing system that will work well for my feet and allow me to do overnight hot-tenting trips with a pulk in relatively flat terrain, mostly off-trail. Unfortunately I’m super overwhelmed by the jargon and high price of alpine ski gear. This leads me to a few questions:
1. When we’re talking about “tech” bindings, I see dozens of options from Dynafit brand alone. Will these options differ in functionality for my intended travel style, or should I just buy the option that seems like the best value for the weight? The Outdoor Gear Lab link you provided gives some great context about what to look for in AT bindings, I’m just curious if that info changes when the primary use is flatter land travel.
2. You said you generally swap out the stock liner and heat mold the boots. Given that, how much do the boots need to feel like they fit when you first get them? To what extent do you just get boots with the right features and modify them to fit?
3. With nordic ski boots, I’ve had unending problems with the uppers cracking as soon as I take them out in super cold weather. Has this ever been a problem with AT boots for you?
Thanks so much for all the info! It’s so helpful to get knowledge from someone who understands local conditions in Alaska.
You would probably benefit from talking with a specialist given your feet …
Check out this post for some options for your binding question: https://thingstolucat.com/ski-touring-equipment-guide/
I haven’t had any problems with my AT boots in cold weather and I want them to fit as well as possible before doing any modification.
As always Luc, very high quality field-tested information! Thank-you!!!
While I’m not using AT boots, I am running boots a size or two big depending on trip objectives. I also prefer lighter single-layer socks. When my feet get cold, typically around -30C, a pair of Rab Hot Socks gets pulled on. I may, of may not, remove a layer of the two-layer DIY closed cell foam insoles. The Hot Socks act as both insulation and as a vapour barrier liner. The Hot Socks dry quickly and also have a light outsole that just works, and yet does not interfere inside a boot.
I LOVE the hot socks! I was so pleased to see Rab pick them up … I can’t remember the original brand.
I’m curious about your DIY insoles … during long trips, I’ve needed to remove insoles when my feet swelled up. I have a sense that there is a smarter insole arrangement than what I do.
Given your special feet, what do you do for summer footwear?
Thanks for all the amazing info you share!
I’m still trying to figure that out! And if you have any recommendations, I’m all ears.
I’ve been in Hokas since they first came out. The stiff sole is very helpful and I credit it for giving me new capacity in summer activities. Even so, I sometimes put a carbon fiber plate (from Amazon, cut with tin snips or a grinder) under my insole to make them even stiffer. The Hoka traction and durability is terrible. The best model I’ve found are the Speed Goats. The cushion packs out after about two weeks and the traction starts to peel off at that time. So these are basically an expensive disposable solution.
The Altra Olympus is a contender with their similarly stiff sole. I really like the forefoot shape of the Altra. But I broke my foot on day 1 in these … maybe had nothing to do with the shoe … but I’m kind of afraid to trust them.
I’ve tried a few ~ultralight hiking shoes but really notice the lack of cushion (a lot of the walking I do is on rocks in river beds). Heavier hiking boots aren’t a great option because the added weight of the (guaranteed wet) boot is hard on my knees, other joints, and doesn’t fit well in the packraft.
I’m not a candidate for Salomon shoes (they are too narrow), which is a bummer because they work well for many of my friends.
Hey Luc!
Great post, thank you so much for sharing your knowledge and experience!
I’m trying to find information about experience on using AT boots for nordic touring skis with a tec toe but it i seems hard to find, so very happy to stumble on your blog. You say you use AT boots for XC skiing, do you just use a tec toe on the skis or do you do any extra tinkering?
There is quite a community of folks using this set up in Alaska … my favorite name for it is ‘monster nordic.’
Mounting a tech toe-piece one-inch in front of the balance point on metal-edged xc skis has been working well for me. I install a flat heel plate as well. I’ve had heel plates with risers but didn’t end up using the risers enough to keep them on.
A few folks have installed minimalist heel pieces so that they can lock in for the downhills. I really want to try this, but have not yet. Nobody who has done it says that it is particularly helpful. But I definitely take some unwanted face plants when skiing down steep slopes due to the free pivot in the toe.
This page might be of interest to you as well: https://thingstolucat.com/ski-touring-equipment-guide/
thanks Luc! I’m going to the hardware store tomorrow to make your bump tool to accomodate my lumpy feet.